If you are interested in becoming a DJ, then there are three things you need to know: how to beat mix, how to use your equipment and, of course, how to scratch.
Although scratching is not a necessity when it comes to establishing your music career, it is a time-honoured skill that every DJ should be able to do, as it can help to showcase your abilities and earn you a lot of respect in the industry.
However, this does not mean that learning to scratch is a simple task (as with beatmatching) scratching takes a lot of practice, which means it could take years before you start scratching like a true professional.
But before you can learn how to pull some of the coolest tricks in the business, you must first understand the basics of how to scratch.
So if you are an aspiring DJ who wants to know how to scratch, then you have come to the right place. In the following article, we are going to teach you how to scratch, while also outlining the basics of the craft and all the important information that you need to know.
So if you are ready to pursue your dream of becoming a DJ, let’s get started…
What Is Scratching?
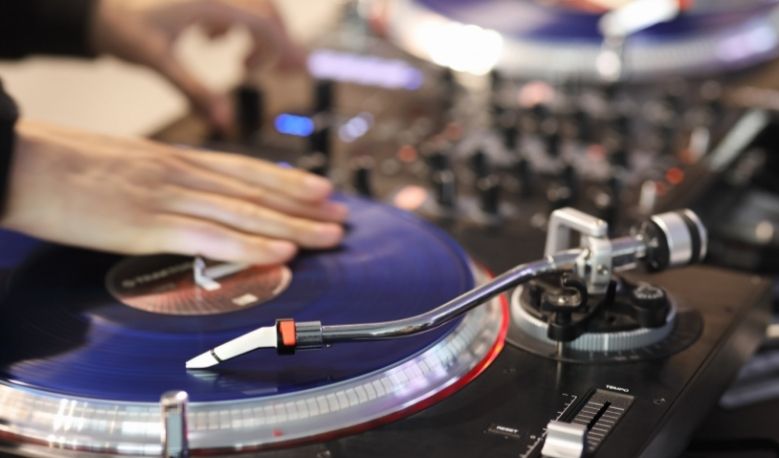
Before we can show you how to scratch, you must first understand what scratching actually is. In its simplest form, scratching is when a DJ pulls back a vinyl record while it is still playing, which helps to produce a distinctive scratching sound.
When repeated and paired with music, this sound can be used to create an interesting effect.
Beyond this, you can also produce a diverse range of sounds by combining the scratches with the movement of the crossfader or by making the scratches faster and slower.
When you do this, you can also use the scratches to complement the music you are playing, which results in a distinctive mix.
However, this does not mean that all DJs use scratching during their sets, as certain musical genres do not lend themselves to the technique.
For example, DJs who specialize in four-to-the-floor genres such as house or techno will rarely use scratching during performances, while others will occasionally utilize the skill to add some variance to the sound of their tracks.
It is also very common to encounter scratching when DJs play more traditional genres such as Hip-Hop, R&B, and Drum & Bass.
Where Does Scratching Come From?
Now that you understand the basic principles of scratching, let’s take a look at the history of the technique and where it first originated.
When turntables were first introduced to the public, they were very different from the ones that we use now, with the biggest contrast being how the turntables were originally operated.
In the beginning, turntables were controlled by motorized belts that were connected to the platter, which means they could not be used for scratching or other techniques.
However, this would all change in the 1970s with the advent of direct-drive turntables, which saw models such as the Technics SL-1200s and the SL-1210s being used for more modern scratching capabilities.
Scratching itself would not become a global phenomenon until 1975 when DJ Grand Wizard Theodore accidentally invented the technique by scratching one of his records after his mother complained about the noise.
As a student of Grandmaster Flash. Grand Wizard Theodore recognized the potential of the effect and took the technique to his teacher who then helped him to develop it into the skill that we all know today.
How To Scratch
Now that you understand the basics and history of scratching, it’s about time that we started taking a look at how you can learn the fundamentals of scratching for yourself.
When beginning to scratch, there are several basic scratching techniques that you must first master before you can explore more exciting avenues.
So to help you further understand these basic techniques, we have outlined each one in the sections below:
The Baby Scratch
The first scratch that you will need to master is known as the baby scratch, as it is the technique that all DJs must learn before anything else.
When utilizing this particular scratch, the intention is to simply pull the record back and make the first scratch, before finally pushing it forward to make the second.
If you are using a DJ turntable and vinyl records, then you can begin the action by spinning the platter and then placing your hand on top of the record to stop it from moving.
When you have done this, you can move the record forward until you have found the start of the beat before finally pushing it. Once the beat passes the stylus, you can then use the record to produce the first part of the scratch.
This should then be followed by the second part of the scratch, which can be created by pulling the record backward.
For the best results, we recommend that you practice this a few times using different speeds, as this will help to manipulate the pitch of the scratch. For example, you will most likely notice that the faster you move the record the higher the pitch will become.
While on the other hand, you can use the same technique to create a low pitch by slowly moving the record. We understand that this may be difficult to visualize, but we promise that this will begin you on your scratching journey.
The Scribble Scratch
After you have mastered the baby scratch, you can then begin to use the scribble, which is a similar technique that uses smaller and faster strokes.
While the baby scratch involves moving the record forwards and backward, the scribble involves moving it forwards and backward for each beat, which means you are essentially doubling the original pace of your baby scratch.
The Chirp Scratch
When you have added the scribble to your repertoire, you can then begin learning the next scratch on our list, which is known as the chirp.
Like the scribble, this technique is similar in design to the baby scratch, although it is considered more advanced due to the addition of the crossfader, which you will use to truncate the first part of the sound.
The general purpose of this scratch is to move the record forwards for the first part of the scratch, before cutting the end of the sound by using your crossfader. This should result in the creation of a short scratch that cuts off abruptly at the end.
After you have done this, you will then pull the record backward until you produce the second part of the scratch.
While doing this, you will also need to push the crossfader back into the central position, as this will allow you to hear the whole sound of the second part.
Overall, this technique requires more precision than the other scratches we have discussed, as you will be expected to move both hands at the same time, with one operating the record and the other operating the crossfader.
Unfortunately, this does mean that you will have to practice this technique a lot if you want to perfect it, as it can be extremely difficult to get right.
For this reason, we recommend that you start slowly and then build towards the final sound, as this will help to build your confidence when gaining speed.
The Forward Scratch
The final scratch we will be discussing is called the forward scratch, which is another technique that will require a certain level of precision to complete. This means that you will need some time to practice before you will be able to execute it perfectly.
The general idea of this scratch is to be able to produce a full forward scratch before using the crossfader to completely cut the second part of the sound.
To do this, you will need to set your crossfader to the central position while executing the forward scratch. However, when the record reaches the most forward position, you will then need to use the crossfader to cut the sound of the record you are scratching.
After you have done this, you will then need to pull the record back to its starting position, which should remain silent due to the crossfader.
Once the record has returned to its original position, you must then move the crossfader back to the middle to complete the forward scratch.
When you have repeated this process several times, you will be able to hear the forward scratches but not the back scratches, which will produce a more direct and punctuated sound.
Other Techniques
Although we have covered some of the most important scratches that you will encounter, there are still other techniques that you will need to master before you can call yourself a professional scratcher.
These techniques include other notable scratches such as the transformer scratch, the flare scratch, and countless others.
However, our advice would be to first practice the basic scratches that we have discussed in this article, as these will help you to understand the fundamentals that you need to get started.
It is also important to check out as many tutorials as you can and to do your research on all things scratch-related.
Final Thoughts
When you have mastered these basic scratches, you can then begin experimenting with putting them together, which is a technique that many DJs use when utilizing scratches in their sets.
However, it is important to remember that learning to scratch takes time, so there is no need to feel disheartened when you are unable to master a scratch right away.
Just remember to have patience and enjoy the process, otherwise, there is very little point in pursuing something that does not bring you joy.
Related Posts:
")
")
")
")
")
")
We hope you love the products we recommend. We may collect a commission if you purchase through one of our links. This doesn't cost you anything extra. If you do, thank you! As an Amazon Associate, I earn from qualifying purchases.
