The best method for cleaning your vinyl record collection is using a record washer or a specially designed vacuum cleaner. However, if you are looking to deep clean them using conventional ways, you can also use wood glue or a vinyl cleaning kit to keep them pristine.
Why You Should Clean Your Vinyl
First released back in 1931, vinyl records are still one of the most popular methods to listen to music.
However, if you own a collection, you will know they require special handling and maintenance to maintain their sound quality.
Your vinyl record collection will last a lifetime if properly cared for, and cleaning records is a big part of that.
While some people enjoy the nostalgia of surface noise, I prefer to keep it to a minimum for a better listening experience.
Below, I run through how to keep your vinyl in tip-top condition and to sound great.
How To Clean Vinyl Records Without Damaging Them
Made using polyvinyl chloride (also known as PVC), every new or old record requires some attention to avoid crackles, pops, and scratches.
Fortunately, the most common vinyl problems are easy to resolve and do not consume a lot of time. We’ve put up a quick guide to keeping your vinyl in good shape.
I’ve broken this guide into four of the most efficient ways when it comes to cleaning vinyl records without damaging them.
These are:
- Using a Record Washer
- Using a Vacuum Cleaner
- A DIY Cleaning Method
- Using Wood Glue
Using A Record Washer
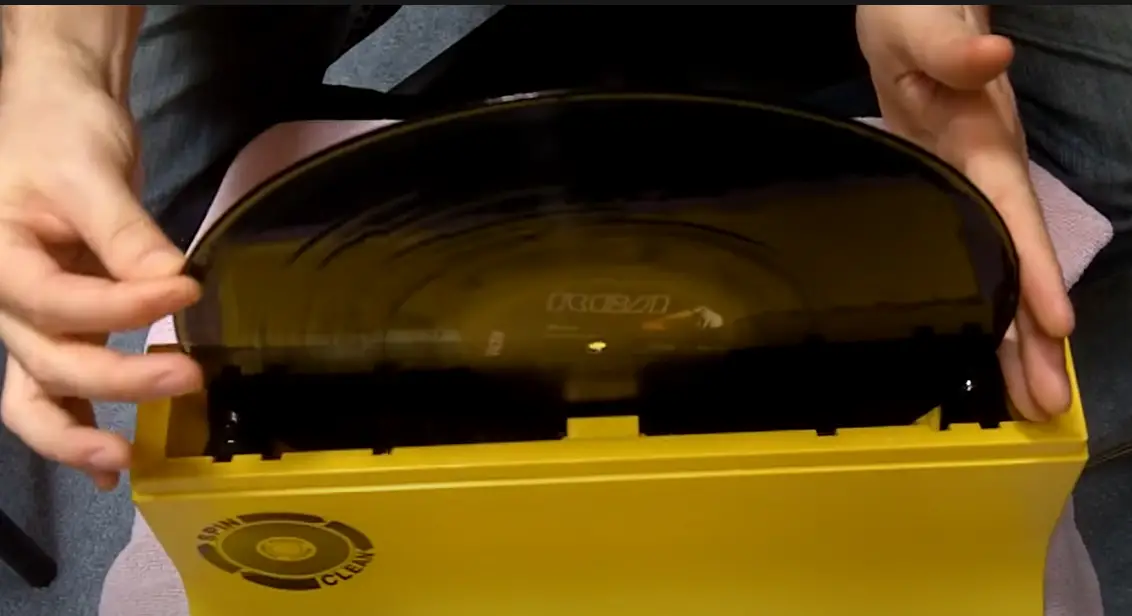
I use the Spin-Clean record washer to get my vinyl fresh and clean. It’s Effective, compact, easy to use, and is everything you need to get the job done.

It is a manual cleaning machine that cleans your records with brushes, rollers, and a cleaning solution.
Place the vinyl in the cleaner, rotate it a few times by hand, either dry them with the cloths provided or let them air dry and you are done.
A slight downside is that it puts a little extra pressure on your records, so it is not quite as good as vacuum-based systems. But for most collectors, it’s more than enough. It’s also a good option for someone who needs to clean vinyl recordings thoroughly.
It does feel pricey for what it is; however, it is a much cheaper alternative than a vacuum cleaner. You’ll also want to get yourself some distilled water rather than using regular tap water.
If you want to save a bit more, you can look at the Knox vinyl cleaner, which is essentially the same, but a few bucks cheaper.
Using A Record Vacuum Cleaner
No, not just any random household vacuum cleaners. You have several options specifically designed for deep cleaning vinyl using suction in today’s market.

For some people, this does not sound too practical or efficient. However, it is one of the best ways to deep clean your vinyl records.
This cleaner has the advantage of sucking up dirt and dust that has settled into the record’s grooves while minimizing pressure and direct contact with the actual vinyl. This is great, although it does come at a price, so be prepared to shell out if you opt for this method.
Also, if you think you can get away with using a regular vacuum, this is a BIG NO – and I do not recommend it at all.
Cleaning Vinyl With The DIY Method
If you are interested in learning about the best method for record cleaning without using any record cleaning machine or fancy vacuum, this section will help you.
There are tons of vinyl record cleaning kits available which are not only easy to use but effectively clean dirt, dust, and fingerprints.

These kits typically come with record cleaning fluid and a velvet stylus brush, allowing you to take care of every part of the record.
With an anti static record brush, some cleaning solution, and a microfiber cloth, you can quickly clean your vinyl by hand. Furthermore, it is cost-effective and straightforward.
Here’s what you need to do:
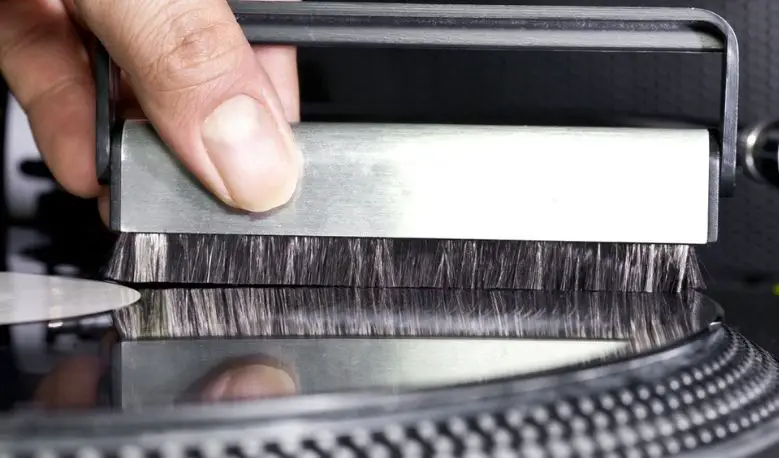
Step 1 – Brush The Record
The first step is to use a record stylus brush.
There are multiple options available in the market to choose from. If you are just beginning and have to deep clean vinyl, I recommend getting more than one anti-static brush.
You don’t necessarily have to use multiple brushes, but it can help before moving on to the next phase if a record is exceptionally dusty.
Begin by lightly rubbing the record’s surface using a circular motion with the brush. You do not want to break the record groove by applying too much pressure. Gently pick up larger particles and debris on the record.

Step 2 – Wash The Record
Always use a specialized record cleaning solution and distilled water to clean vinyl.
I have seen people resorting to water, dish soap, and a cloth, but this is not recommended!
However, it is crucial to understand that not all solutions are equal.
Any cleaning fluid that contains isopropyl alcohol should be avoided at all costs. While it will remove the dirt from your record, it will also destroy the protective covering on your vinyl over time.
My recommendation would be to get a record cleaning fluid containing deionized water.
Just apply a gentle spray of the solution and let it sit for about five minutes.
After that, use a record brush (also mentioned in the previous step) and start wiping the disc in a circular motion. This will clean up the solution and remove any dirt or dust particles from your vinyl.
Step 3 – Dry The Record
Once you have followed the two steps, it’s time to dry the record.
It would be best if you only used a microfiber cloth to dry vinyl. It is pretty simple – all you have to do is gently pat the cloth to dry.
Allow the record to air dry for up to thirty minutes before putting it back in its sleeve to ensure that it is entirely dry. Moisture on your vinyl can cause the sleeve to mold, damaging it.
Quick Tip: It is unnecessary to follow all the steps if you regularly clean your records using a microfiber cloth or other cleaning kit. The least you can do to maintain a good quality collection is always use this step before and after playing a record. This will help you keep them clean, meaning you do not have to follow the entire DIY method every time.
But, if you are planning to purchase a used vinyl, it’s recommended to go through the entire tutorial for deeper cleaning.
Using Wood Glue To Clean Vinyl
Wood glue is one of the best ways to make your vinyl sound as good as new. It may not be a common way to clean your records, but it is one of the best ways to make the vinyl sound as good as new.
So, how do you use it? Allow me to do a brief step-by-step guide for your understanding.
Step One – Place the vinyl record on a piece of card.
Step Two – Spread wood glue over it and smooth it down with a card or a roller to cover the entire disc. Make sure there are no holes. However, the label in the center should not be covered with glue.
Step Three – Once done, allow the glue to dry overnight.
Step Four – After it is thoroughly dried, you can start peeling off the glue of the record. It is that easy!
Result – A clean and shiny as a new vinyl record. It’s less expensive than buying a costly vacuum record cleaner and an excellent way to improve the audio quality of older records.
No matter how effective this method is, using glue to clean vinyl records has its fair share of disadvantages. Because wood glue is difficult to deal with, it requires more effort than usual cleaning records.
Apart from this, the amount of glue required to clean a single vinyl is excessive. This means the overall cost to deep clean your entire collection would be high.
The procedure takes far too long, mainly because you have to wait for the glue to dry overnight before peeling it off, rinsing the disc, then drying it once more.
How To Store Your Records Properly
What’s next now that you have thoroughly cleaned your collection? It is time to store them properly.
To avoid sound problems, vinyl records should be stored properly.
Place your records in a tidy, cool location. It is also recommended to keep your collection out of direct sunlight to avoid warping or damage from the sun.
The records should always be kept vertically. Allow enough space for each record to fit comfortably without rubbing against other recordings.
The gap protects the recordings from being damaged. To eliminate shedding and dust buildup, keep your recordings in a sleeve, but avoid paper sleeves.
How To Handle Your Vinyl
Hold your records by the edges when handling them. This is because your fingers can transfer dust and oil onto their surface. Try not to touch the vinyl directly and always treat them with care to avoid gradual dirt and oil damage.
How to Remove Scratches from a Vinyl
You can remove scratches from vinyl records using sandpaper. Before attempting to remove scratches, be sure that all dirt and dust have been removed from the scratch. You can use a toothpick or a wood glue peeling technique to do this.
Once you have cleaned the dirt and dust particles from the record, I recommend getting some wet or dry sandpaper with a 1500-grit rating. Wet the sandpaper and wash the record. Place the record on a hard and leveled surface and sand each side gently.
All you need is easy strokes parallel to the grooves. You do not have to use a lot of force or keep rubbing the sandpaper for an extended period. Wash off the sanded material after going around the record four or five times.
While this seems unconventional or scary, it can help improve the overall sound quality of badly damaged records.
Related Questions
How Long Does It Take To Clean Vinyl?
It all depends on how you plan to clean your records. For instance, if you use a record washer, you would be done in five minutes per vinyl. (not including drying)
Similarly, suppose you opt for the DIY method. In that case, it may take anywhere between 45 and 60 minutes per record (unless you simultaneously multitask).
How Often Should You Clean Vinyl Records?
This is subjective as well. I recommend everyone clean the vinyl each time they play it using a record brush or microfiber cloth (both before and after). Cleaning them regularly helps eliminate dirt and dust and reduce static from your records.
How To Clean Vinyl Records with Soap and Water?
If we are talking about tap or regular water, it is a big NO!
You should not be using dish soap or water to clean vinyl. Using this combination will only damage your collection rather than clean it.
Final Words
I find cleaning my records a very therapeutic and enjoyable process. However, that can soon wear off if you have a collection of thousands of records.
By frequent dusting and upkeep, you can help you avoid more difficult cleaning procedures. All this takes is a quick wipedown before and after each play.
Taking the time to take care of your records, means they will last longer, sound better, and be worth more in value.
")

We hope you love the products we recommend. We may collect a commission if you purchase through one of our links. This doesn't cost you anything extra. If you do, thank you! As an Amazon Associate, I earn from qualifying purchases.
